Quickstart#
This is a quickstart guide for creating a simple dashboard.
Project Setup#
We recommend using a virtual environment such as pyenv to manage your dependencies and Python versions. From this point we assume you have a environment setup, activated & pip installed.
Create a new Django project:
# Create the project directory
mkdir demo
cd demo

# Install
pip install django-dashboards

# Set up a new project
django-admin startproject demo .
cd demo
django-admin startapp mydashboard
cd ..

# Sync the database
python manage.py migrate
Dashboards#
First you need to setup a dashboard definition. Create a new file demo/mydashboard/dashboards.py:
from dashboards.dashboard import Dashboard
from dashboards.component import Text, Chart
from dashboards.registry import registry
from demo.mydashboard.data import DashboardData
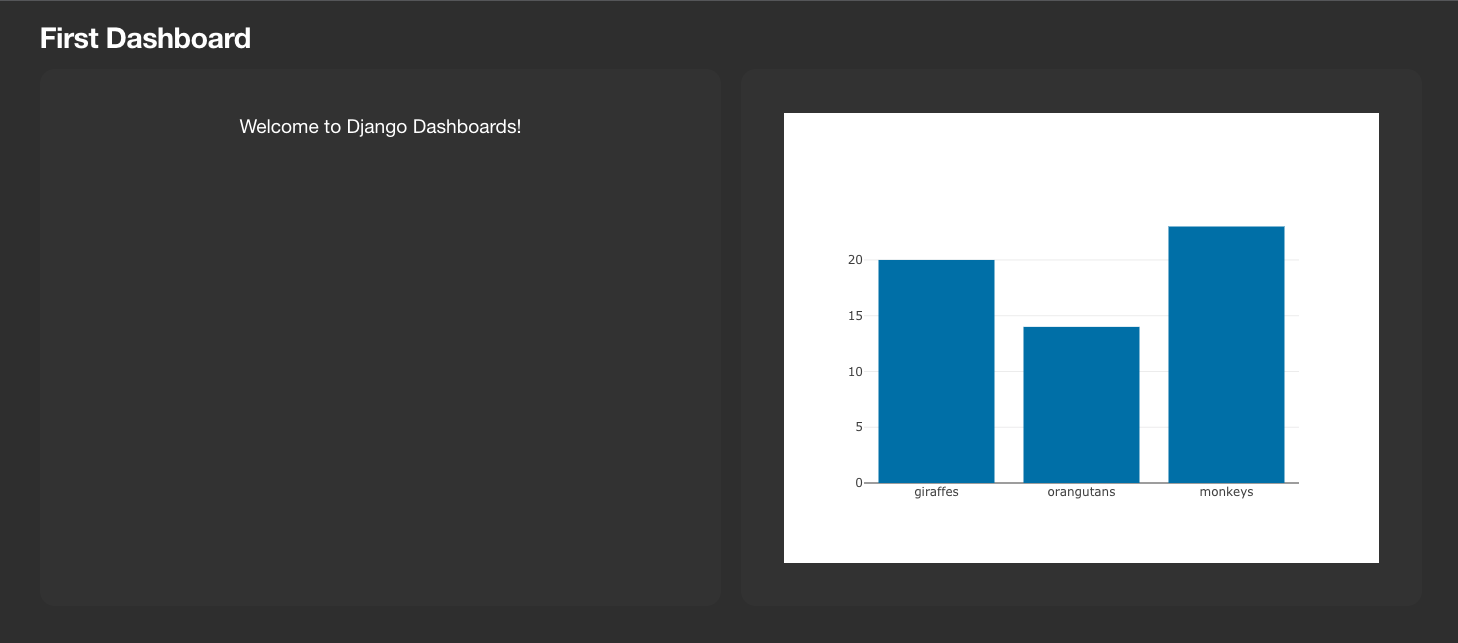
class FirstDashboard(Dashboard):
welcome = Text(value="Welcome to Django Dashboards!")
animals = Chart(defer=DashboardData.fetch_animals)
class Meta:
name = "First Dashboard"
registry.register(FirstDashboard)
Remember to register your dashboard class in order for it to work with the auto urls.
Data#
Data for the dashboard component can be inline (welcome) or come from a callable (animals).
In the example above the data for animals is returned from fetch_animals. We set this up now.
Create a new file demo/mydashboard/data.py:
import json


class DashboardData:
    @staticmethod
    def fetch_animals(**kwargs) -> str:
        data = {"giraffes": 20, "orangutans": 14, "monkeys": 23}

        return json.dumps(dict(
            data=[
                dict(
                    x=list(data.keys()),
                    y=list(data.values()),
                    type="bar",
                )
            ]
        ))
This returns a json object with values for x, y, and type. This is interpreted by the component and rendered as a bar chart.
Config#
In order to get the auto urls to register we need to update demo/mydashboard/apps.py:
from django.apps import AppConfig


class MydashboardConfig(AppConfig):
    default_auto_field = 'django.db.models.BigAutoField'
    name = 'demo.mydashboard'

    def ready(self):
        # for registry
        import demo.mydashboard.dashboards  # type: ignore # noqa
URLs#
Next we need to wire up the dashboard urls. In demo/urls.py:
from django.contrib import admin
from django.urls import include, path

urlpatterns = [
    path('admin/', admin.site.urls),
    path('dashboards/', include('dashboards.urls')),
]
Settings#
Finally add dashboards and your new app demo.mydashboard to INSTALLED_APPS in demo/settings.py:
INSTALLED_APPS = [
    ...
    "dashboards",
    "demo.mydashboard",
]
And we’re done.
Viewing the Dashboard#
Start the Django server from the command line.:
python manage.py runserver
The dashboard urls are automatically generated based on the app name and dashboard meta name.
For this demo the url will be http://127.0.0.1:8000/dashboards/mydashboard/firstdashboard/
Expanding your dashboard#
FirstDashboard was very simplistic, so lets expand on that and use some more components. We’ll inherit from FirstDashboard to create:
from dashboards.dashboard import Dashboard
from dashboards.component import Text, Chart, Table
from dashboards.registry import registry

from demo.mydashboard.data import DashboardData, ContentTypeTableSerializer, ContentTypeChartSerializer


class FirstDashboard(Dashboard):
    welcome = Text(value="Welcome to Django Dashboards!")
    animals = Chart(defer=DashboardData.fetch_animals)

    class Meta:
        name = "First Dashboard"


class SecondDashboard(FirstDashboard):
    express_animals = Chart(defer=DashboardData.express_animals)
    content_types = Table(value=ContentTypeTableSerializer)
    content_types_chart = Chart(defer=ContentTypeChartSerializer, grid_css_classes="span-12")

    class Meta:
        name = "Second Dashboard"


registry.register(FirstDashboard)
registry.register(SecondDashboard)
and:
import json

import plotly.express as px
from django.contrib.contenttypes.models import ContentType

from dashboards.component.chart import ChartSerializer
from dashboards.component.table import TableSerializer


class DashboardData:
    @staticmethod
    def fetch_animals(**kwargs) -> str:
        data = {"giraffes": 20, "orangutans": 14, "monkeys": 23}

        return json.dumps(dict(
            data=[
                dict(
                    x=list(data.keys()),
                    y=list(data.values()),
                    type="bar",
                )
            ]
        ))

    @staticmethod
    def express_animals(**kwargs):
        data = dict(
            animal=["giraffes", "orangutans", "monkeys"],
            value=[20, 14, 23]
        )

        fig = px.pie(
            data,
            names='animal',
            values='value',
        )

        return fig.to_json()


class ContentTypeTableSerializer(TableSerializer):
    class Meta:
        columns = {
            "app_label": "App",
            "model": "Model"
        }
        model = ContentType


class ContentTypeChartSerializer(ChartSerializer):
    class Meta:
        fields = ["app_label", "model"]
        model = ContentType

    def to_fig(self, df):
        fig = px.scatter(
            df,
            x="app_label",
            y="model",
        )

        return fig
Here we’ve added a few more components:
express_animals- A deferred pie chart, that instead of direct json renders via plotly express to_json(), which allows us to quick;y convert dicts and Pandas DataFrames into charts.content_types- A table (which could also be deferred) via ourTableSerializer, which outputs data direct from a django model.content_types_chart- A chart which is an example of aChartSerializer, again outputting data direct from a django model.
Which looks like:
What Next?#
Learn more about creating and defining the Dashboards and model dashboards (i.e a dashboard DetailView) and altering the Layouts of your dashboards.
Get our Demo project running.
See which Components are available and how to configure these to fit your needs. See also how to Build your own components.
Setup Permissions to restrict access to your dashboards to individuals or user groups.
Change the default Templates & Styles and styles to match your theme.